고정 헤더 영역
상세 컨텐츠
본문
반응형
Visual Sutdio 설치 링크
https://visualstudio.microsoft.com/ko/vs/?rr=https%3A%2F%2Fwww.google.com%2F
Visual Studio 2019 | 무료 다운로드
Visual Studio에서 코드 완성, 디버깅, 테스트, Git 관리 및 클라우드 배포를 사용하여 코드를 작성할 수 있습니다. 지금 Community를 무료로 다운로드하세요.
visualstudio.microsoft.com
Visual Studio 를 설치했다면.
이제 MFC를 설치해보자.

C++ 를 사용한 데스크톱 개발 , 최신 V142 빌드 도구용 C++ AtL(x86 및 x64)를 선택해준다.
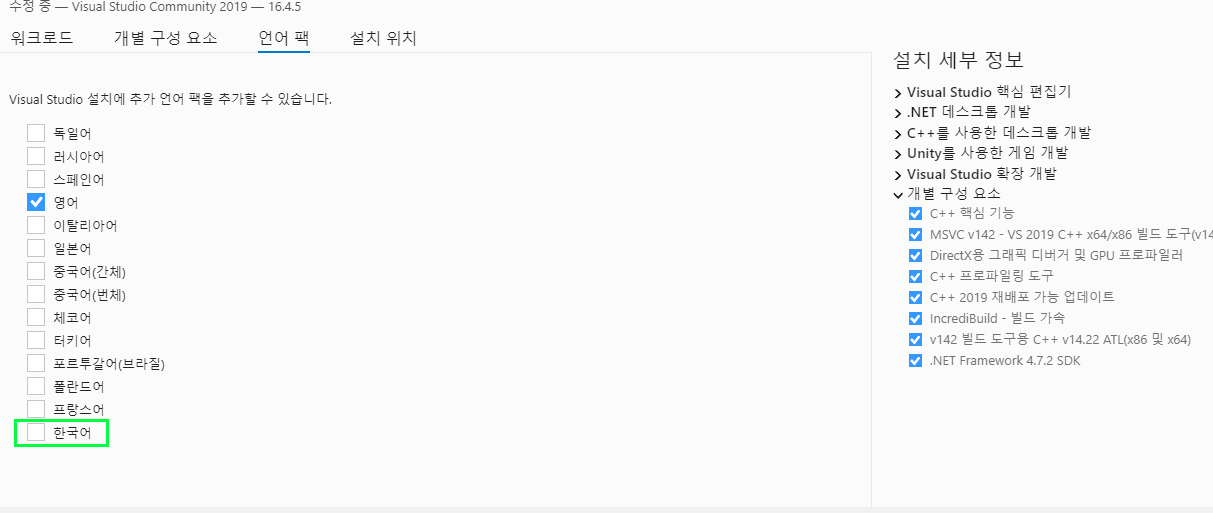
만약 Visual Studio 메뉴를 영문이 아닌 한국어로 보고싶다면 .
우측 상단에 언어팩에 한국어를 추가해주면된다.
현재 이 개발환경세팅은 영문판 기준으로 진행된다.
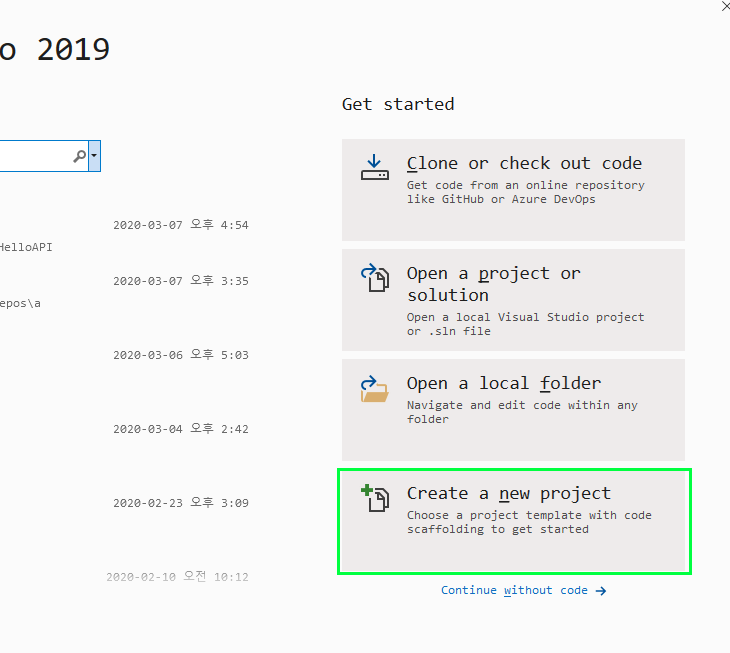
설치가되었다면.
실행하여 프로젝트를 만들어보자.
1.새 프로젝트 만들기
2. 윈도우 데스크톱 마법사를 이용하여 생성한다.

3. 프로젝트이름, 경로, 솔루션 네임을 수정해준다.
생성하기들 누르면
애플리케이션 타입이 나오게되는데.
Console Applicaiton 이 아닌 ,
Desktop Application (.exe) 로 선택해준다.

4. 빈프로젝트로 생성해준다.

Source Files 마우스 우클릭 -> Add -> New Item..

cpp 파일을 생성해준다.

다음코드를 복사하여 테스팅 한다.
#include <windows.h>

#define ID_OK_BTN	2000

HINSTANCE g_hInst;
LPCTSTR lpszClass = L"Welcome to MFC";


LRESULT CALLBACK WndProc(HWND, UINT, WPARAM, LPARAM);

int APIENTRY WinMain(HINSTANCE hInstance,	HINSTANCE hPrevInstance,	LPSTR lpszCmdParam,	int nCmdShow){
	HWND hWnd;
	MSG Message;
	WNDCLASS WndClass;
	g_hInst = hInstance;


	WndClass.cbClsExtra = 0;
	WndClass.cbWndExtra = 0;
	WndClass.hbrBackground = (HBRUSH)GetStockObject(WHITE_BRUSH);
	WndClass.hCursor = LoadCursor(NULL, IDC_ARROW);
	WndClass.hIcon = LoadIcon(NULL, IDI_APPLICATION);
	WndClass.hInstance = hInstance;
	WndClass.lpfnWndProc = (WNDPROC)WndProc;
	WndClass.lpszClassName = lpszClass;
	WndClass.lpszMenuName = NULL;
	WndClass.style = CS_HREDRAW | CS_VREDRAW;
	RegisterClass(&WndClass);     //메인윈도우 클래스 등록

	hWnd = CreateWindow(lpszClass,			//윈도우클래스 이름
		L"Window Title",			    //윈도우타이틀
		WS_OVERLAPPEDWINDOW | WS_VISIBLE,   //윈도우스타일
		500, 50,							//윈도우가 보일때 X Y좌표
		600, 600,							//윈도우의 폭과 높이
		(HWND)NULL,							//부모윈도우 핸들
		(HMENU)NULL,						//윈도우가 가지는 메뉴핸들
		hInstance,							//인스턴스핸들
		NULL);								//여분의 데이터

	ShowWindow(hWnd, nCmdShow);

	while (GetMessage(&Message, 0, 0, 0)) {
		TranslateMessage(&Message);
		DispatchMessage(&Message);
	}
	return Message.wParam;
}

LRESULT CALLBACK WndProc(HWND hWnd, UINT iMessage, WPARAM wParam, LPARAM lParam) {
	LPCTSTR text = L"Hello MFC";
	switch (iMessage) {
	case WM_PAINT:	{
		PAINTSTRUCT ps;
		HDC hdc = BeginPaint(hWnd, &ps);
		TextOut(hdc, 100, 100, text, lstrlen(text));
		EndPaint(hWnd, &ps);
		return 0;
	}
	case WM_DESTROY: PostQuitMessage(0);
		return 0;
	}
	return(DefWindowProc(hWnd, iMessage, wParam, lParam));
}
아래와 같이 출력된다면 기본 개발환경은 마무리된다.

아래와 같은 에러가발생할때
Severity Code Description Project File Line Suppression State
Error C2440 'initializing': cannot convert from 'const wchar_t [15]' to 'LPCTSTR'
Severity Code Description Project File Line Suppression State
Error C2664 'HWND CreateWindowExA(DWORD,LPCSTR,LPCSTR,DWORD,int,int,int,int,HWND,HMENU,HINSTANCE,LPVOID)': cannot convert argument 3 from 'const wchar_t [13]' to 'LPCSTR'
Severity Code Description Project File Line Suppression State
Error C2440 'initializing': cannot convert from 'const wchar_t [10]' to 'LPCTSTR'
솔루션 익스프로러 -> 현재 프로젝트 마우스 우클릭 -> 속성

Advanced -> Character Set : Use Unicode Character set 으로 수정


반응형


